-
Posts
6,665 -
Joined
-
Last visited
-
Days Won
36
Content Type
Profiles
Forums
Events
Everything posted by justin
-
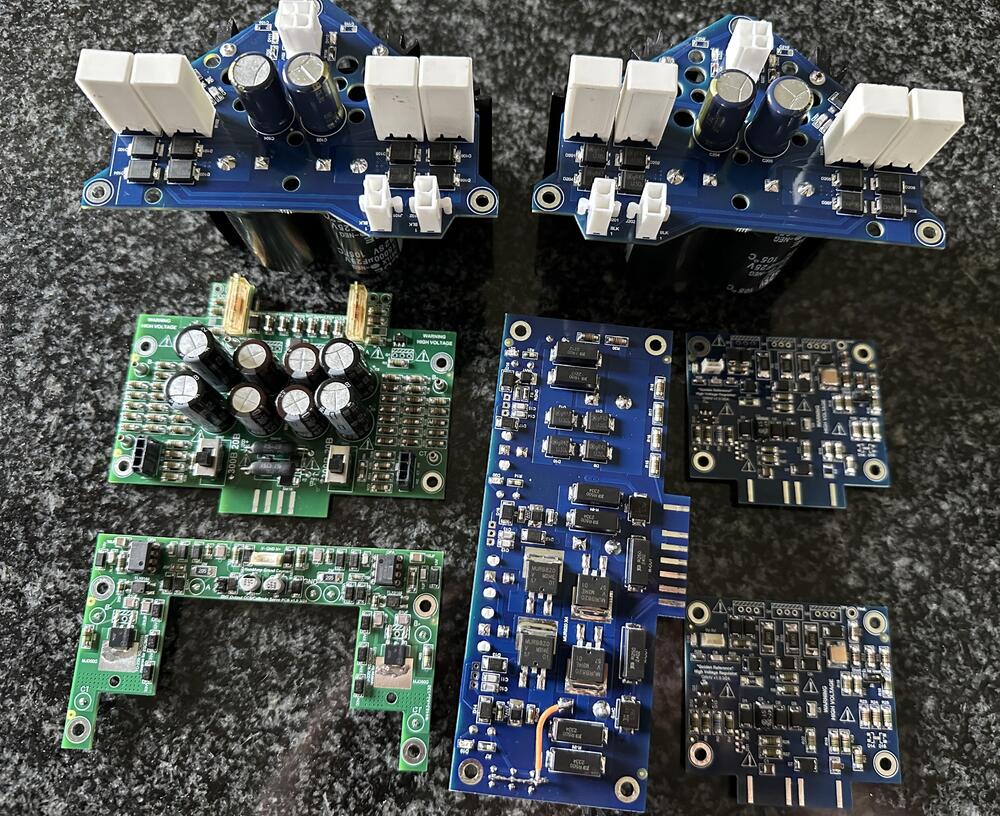
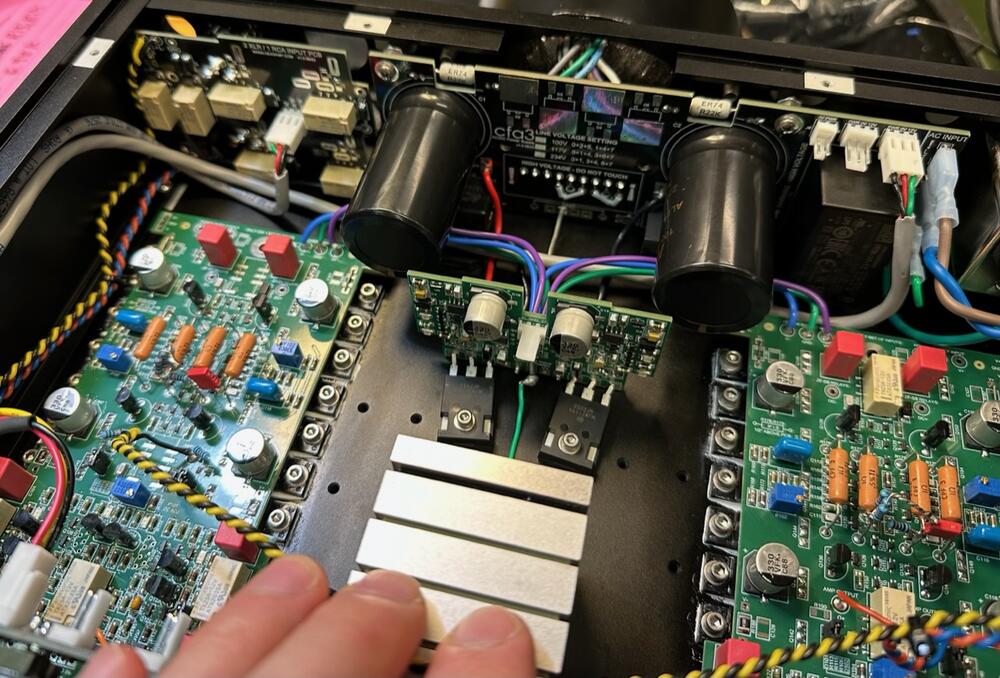
Taking a photo of new boards before blowing them up later tonight they are: top - 2x 5V linear supplies 300B/20B cathode/plate cathode servo +/-12, +12 linear supply 2x GRHV
-
Yes, stuck in that hell hole all weekend at a nearby holiday inn express
-

Preamp, Stax Amp and Controlling Volume level...
justin replied to Billiam's topic in Headphone Amplification
don't think there's a right or wrong answer You can turn the volume to max on the Stax amp and then adjust the volume from the pre-amp. This will be similar or identical to using the volume bypass switch or, adjust STAX amp volume level so that your preferred pre-amp volume level is in the middle or most comfortable portion of the preamp vol ctrl range, then adjust from there using only the preamp volume -

and now for something completely different part 3
justin replied to kevin gilmore's topic in Do It Yourself
Production CFA3 enclosure arrived yesterday 😃 I told the machine shop to not bead blast the heatsink mounting side, just leave it mill finished. They must have thought I meant to mill it after anodizing. I can't figure out if it's a win or not but it's different? -
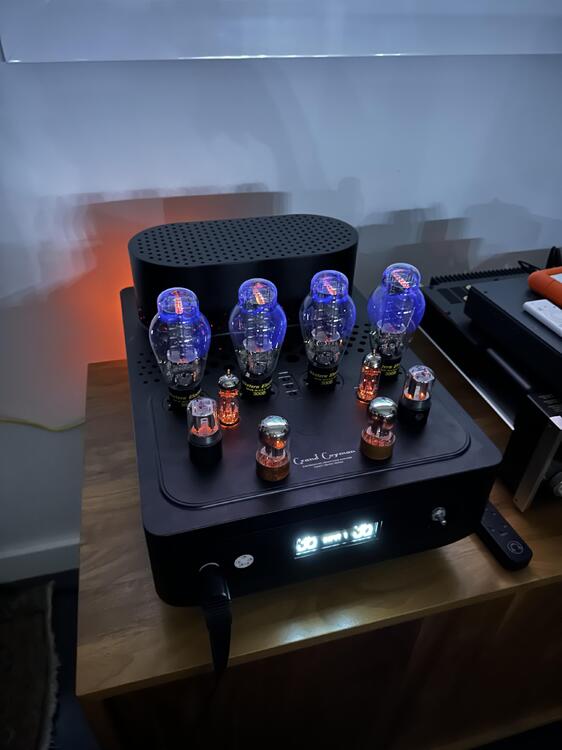
Here’s a quad of Western Electric 300B in the Grand Cayman. Just something i am trying while waiting on the first batch of finished enclosures to arrive (the power transformers just got here by boat) how does it compare with 20B? So far, here are some bullet points - Surprisingly low noise. This is with dc heaters. The blue hawaii, or Grand Cayman with 20B or 300B all have about the same noise floor, using decent tubes. - The gain is a bit low. About 375x with WE 300B, 425x with EHX, and the EML 20B version is about 700x. [note: i havent tried changing any feedback setting yet] for comparison most Stax amps are between 500x and 1000x gain the lower gain could work out great if adding a preamp in front of the amp, but for a quick increase to 1000x gain simply replace the input tube 6SN7/12SN7 with a higher gain 6SL7/12SL7 As one would expect, distortion is higher. About .1 to .2% under load, or about 10x as high as the 20B which one sounds better is likely going to be very subjective and will have to wait until i get a 2nd one put together for proper A/B comparisons
-
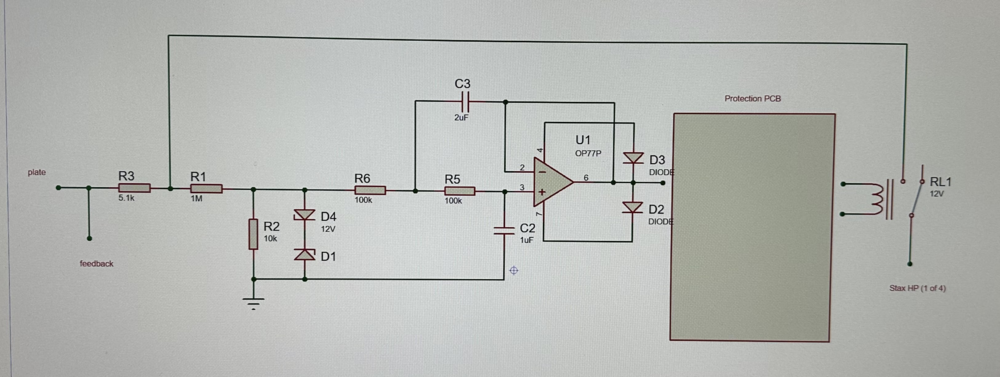
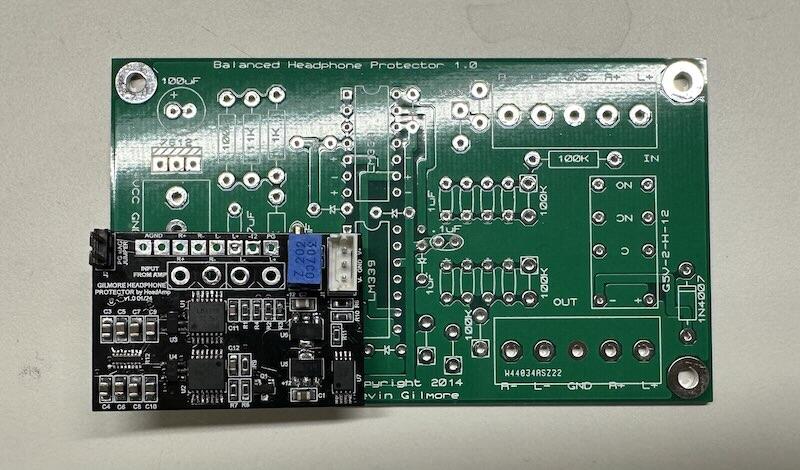
I'm going to try an electrostatic HP version of Kevin's balanced HP protector. I may keep all 4 outputs separate, using 1kV rated relays, which are usually single pole anyway. Plus this way each output could have its own status LED, which would show which of the 4 outputs (L+, L-, R+, R-) was triggered. Here is a preliminary idea:
-
Room effect sounds reasonable compared to a lot of the stuff I have been reading lately
-
Happy birthday!
-

and now for something completely different part 3
justin replied to kevin gilmore's topic in Do It Yourself
I just completed testing both channels of the latest version of the smd version of the CFA3 boards, and here are some distortion measurements: Test Setup: balanced 1KHz/6Vrms from Tektronix SG 505 oscillator, to HeadAmp Gilmore CFA3 (balanced output), to General Radio 1840-A output power meter & to Tektronix AA501A THD analyzer (which has about .001 to .003% THD on its own). 2Vrms Output THD Test (Load, THD) 300, .002% 200, .002% 150, .002% 100, .002% 50, .003% 32, .007% 16, .01% 6Vrms Output THD Test (Load, THD) 300, .002% 200, .002% 150, .002% 100, .002% 50, .003% 32, .013% 16, .15% 20Vrms Output THD Test (Load, THD) 300, .017% 200, .017% 150, .018% 100, .022% 50, .26% (12W) 32, .42% (18W) Max Output Level THD Test (Load, Watts, THD) 300, 2W, .03% 200, 3W, .03% 150, 4W, .04% 100, 6W, .05% 50, 12W, .26% 32, 18W, .42% 16, 20W (meter limit), <1% ZF, <.3% SS One thing that surprised me was the 2 channels had virtually identical THD (even in ZF mode) out to 2-3 decimal places until getting down to ~16 ohm impedances where there started to be a little variation -
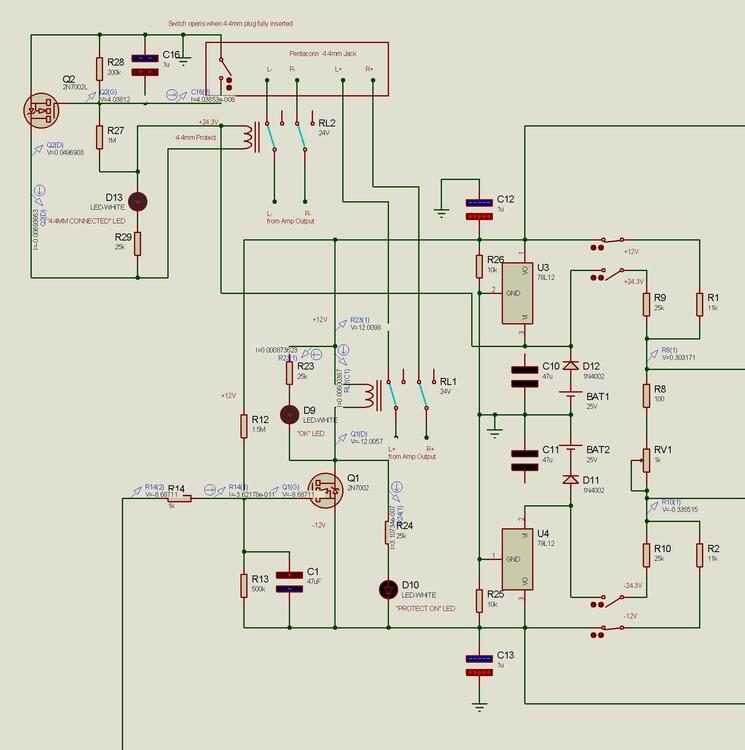
almost but not quite disconnecting the L- and R- with a relay didn't solve all the problems, I found 2 conditions that remain, depending on how far the plug is inserted: 1) R+ and GND becomes connected to L+, L- of the headphone I think this is OK, but I'm considering disconnecting the GND pin of the 4.4mm jack. As a balanced headphone jack, I don't think the GND has any real purpose 2) R+ and L+ connect to L+, L- of the headphone this is the condition just before the final push to get the plug fully inserted. I'm not thrilled with it, but it may be OK. adding a 2nd relay or using a 4 pole relay to switch all 4 pins would also fix both issues
-
Tested the 4.4mm short protection today. The relay disengages if the plug is even .5mm from fully inserted, so i think it will work IMG_3731.mov
-
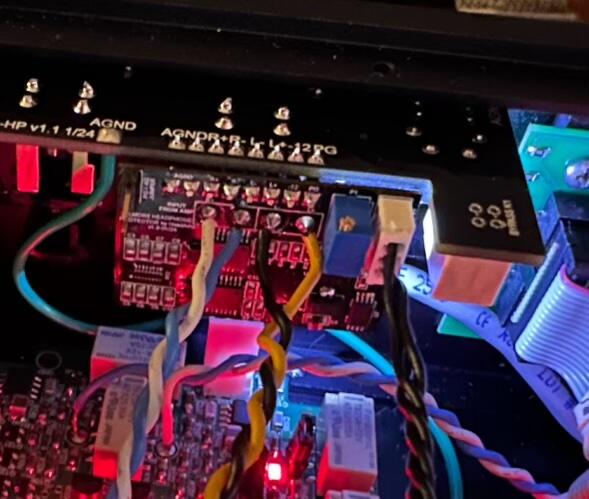
I made a SMD version of the Protector PCB for the CFA3, and after testing it this weekend I came up with some ideas for changes #1 - add blocking diodes in series with the power supply inputs. first thing I did was fry the V+ regulator by hooking up power backwards. other protection diodes for the regulators could be added, but I think they're less important #2 - add minimum load resistors for the regulators (R25, R26). I've previously noticed some 3-pin regulators can have an unstable output voltage if their load is too low. the resistors are so each regulator has at least a 5mA load #3 - option of getting DC voltage reference from the +/-12 regulators or the external supply. In this case, the +/-12 regulators could have as much as a 0.5V imbalance which requires hand selecting resistors to set the voltage reference (the voltage across R8 + RV1). if powering the protector with LT1021 referenced GRLVs, the voltage is going to be within millivolts for both + and - references. You would install either R1 or R9, and R2 or R10. the PCB could also be designed to allow switching between the two for two different range options. one feature of using the GRLV / higher voltage supplies for the reference is if those supplies were to become damaged and start outputting a different voltage, the reference will probably be thrown off more than enough to permanently disable the output jacks until the problem is found/fixed. #4 - added RV1 pot, the purpose is to adjust the range of the protection if it is too sensitive or not enough #5 - added dual indicator LEDs, for "Good" (D9/white) and "Protection On" (D10/orange). Not a bi-color LED, but 2 separate LEDs next to each other. The white "good" LED will be lit but very dim when the Protect LED is on, and the orange will overpower it. #6 - changed relay from 12 to 24V for 1/2 the current and to use more equal current from the +/-12V regulators #7 - added 4.4mm Pentaconn jack short protection. The 4.4mm jack has a switch in the back that only opens when the plug has been fully inserted. The relay keeps the L- and R- pins disconnected, which is every other pin on the jack, until the plug has been fully inserted + a .5 second delay, and then instant release of relay when the plug starts to be removed SMD version & in CFA3
- 139 replies
-
- 11
-

-

and now for something completely different part 3
justin replied to kevin gilmore's topic in Do It Yourself
Has anyone looked into protection from shorting due to 4.4mm jacks being inserted/removed, or partially inserted? The latter seems pretty common as the plug takes a bit of force to push in for the last .1", which is what opens the jack's switch. My idea for protection is using a 2-pole relay to disable the L- and R- pins when the switch is closed. This way, there will only be anything connected to L- and R- on the 4.4mm jack when the plug has been fully inserted I think this will fix the problem by making it impossible for any conductors to momentarily short together, unless I am missing something. -
the reasoning was to set the adjusted value slightly high, rather than slightly low, due to ice cold power ups in the winter just minutes after it comes off the UPS truck
-
or use some gentle compressed air and see if you can locate a spot of thermal instability
-
remove the PCB on the power supply front panel there are 2 sets of wire jumpers for each one ,cut the 2 wires that go into pin 3+4 and solder them together The necessary pin connections are written on the board You should also reduce the value of the AC Input fuses by 50% WARNING: Do not attempt any of this unless you are qualified and experienced
-
the tour? I can start one if there's still interest
-

unbalanced/balanced to balanced tube input
justin replied to kevin gilmore's topic in Do It Yourself
-

and now for something completely different part 3
justin replied to kevin gilmore's topic in Do It Yourself
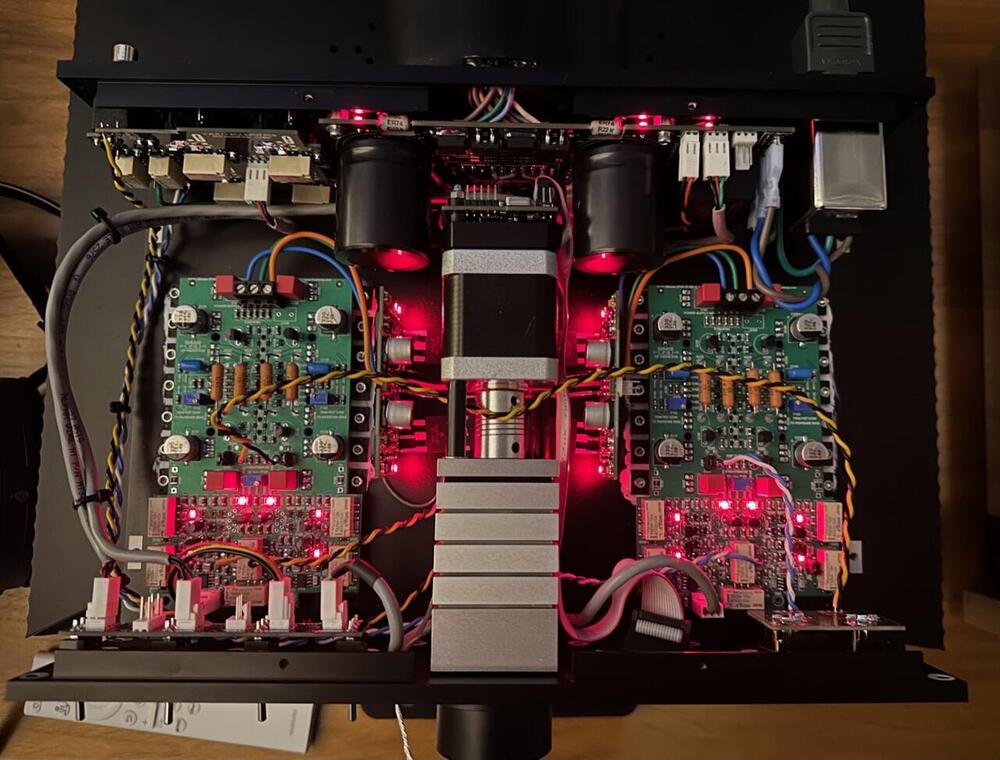
And now for the Deluxe edition. It adds dual mono Golden Reference regulators and a motor w/ remote for the 47-step attenuator -

and now for something completely different part 3
justin replied to kevin gilmore's topic in Do It Yourself
Round 2 for pcbs in the cfa3 - updates to back panel psu board, input connectors & new vertical layout for golden reference regulators also making it easier to wire the star ground -
condition could have been VG...or worse
-

and now for something completely different part 3
justin replied to kevin gilmore's topic in Do It Yourself
isn't that just a couple of wall warts? -
from my own limited experience, the loss of export sales is always 10x whatever could be saved by buying components from the country with the weaker currency. in theory RK50 pots should have dropped 50%, but they're actually up 50% from a few years ago
-
a few years ago I was on some Zoom calls with another company that wanted to make a cheap electrostatic amp. 5 guys on a Zoom call. they expected to sell thousands. To who and for what headphones?? the whole thing won't cover the salary of 1 person. sometimes I'm not sure people grasp the size of this market


